
本文介绍了python中常用第三方包的使用,包括API调用、发送短信、网页抓取、浏览器自动化等比较流行的使用场景,以及PDF的使用、Excel的使用和科学计算numpy的简单介绍。
调用API
现代的开发一般都是前后端分开,后端一般都提供API供前端或其他后端调用。python调用api,需要用到requests包。
我们以yelp的api为例介绍如何调用。
先安装:
pipenv install requests
google搜索 Yelp API,能进到这个页面:
https://www.yelp.com/developers/documentation/v3
我们选择 search测试,能看到API端点是:
GET https://api.yelp.com/v3/businesses/search
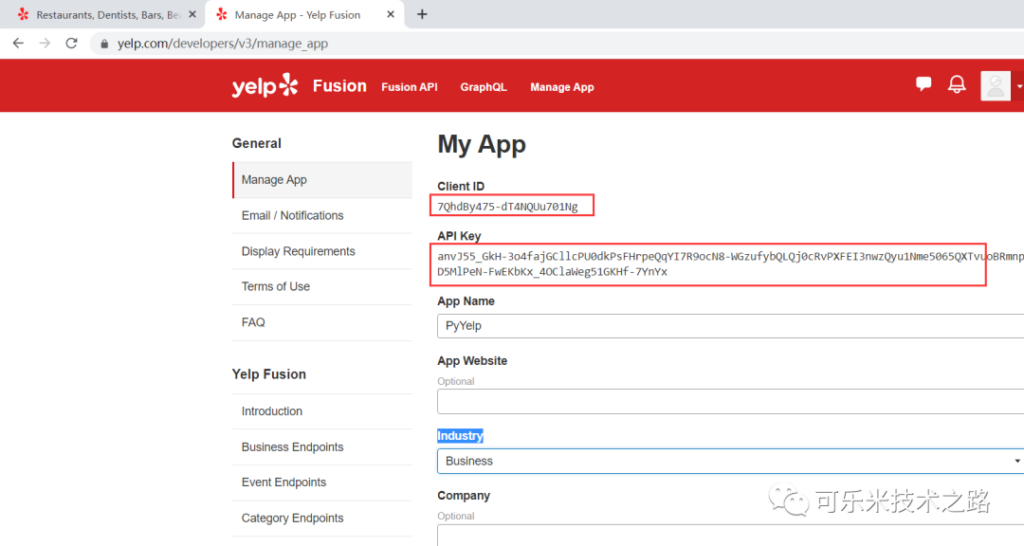
首先在yelp中创建一个应用,比如名为PyYelp,Industry为 Business。得到Client ID和API Key,类似用户名和密码,这样后面就可调用。
import requests
response = requests.get(“https://api.yelp.com/v3/businesses/search”)
print(response)
# {
# “error”: {
# “code”: “VALIDATION_ERROR”,
# “description”: “Authorization is a required parameter.”,
# “field”: “Authorization”,
# “instance”: null
# }
# }
# 表示需要提供Authorization的用户相关授权信息
添加授权信息:
…
url = “https://api.yelp.com/v3/businesses/search”
api_key = “anvJ55_G****”
headers = {
“Authorization”: “Bearer “+api_key
# 使用Bearer token,token为前面创建APP时得到的API KEY
}
response = requests.get(url, headers=headers)
print(response.text)
…
# 得到 {“error”: {“code”: “VALIDATION_ERROR”, “description”: “Please specify a location or a latitude and longitude”}}
# 表示还需提供区域位置信息
添加位置信息:
…
params = {
“location”: “NYC”
}
response = requests.get(url, headers=headers, params=params)
print(response)
# 能获取正常数据了
# <Response [200]>
…
我们来尝试获取数据。
…
businesses = response.json()[“businesses”]
# json()方法将数据转换成字典,然后获取”businesses”的值,是个列表
for business in businesses:
print(business[“name”])
# 也可以直接和列表推导方式,如下:
names = [business[“name”]
for business in businesses if business[“rating”] > 4.5]
隐藏API密钥:
开发过程进行版本管理,比如用到git,这些API密钥不能上传到github上,需要隐藏。
下面是一个参考做法:
新建config.py文件,并将api_key=”***”这行移到这个文件。
再在主文件中导入config.py
import config
程序中用config.api_key访问。
再添加.gitignore文件,添加 config.py,排除这个文件。
发送短信
使用Twilio可以很方便给应用程序发短信。
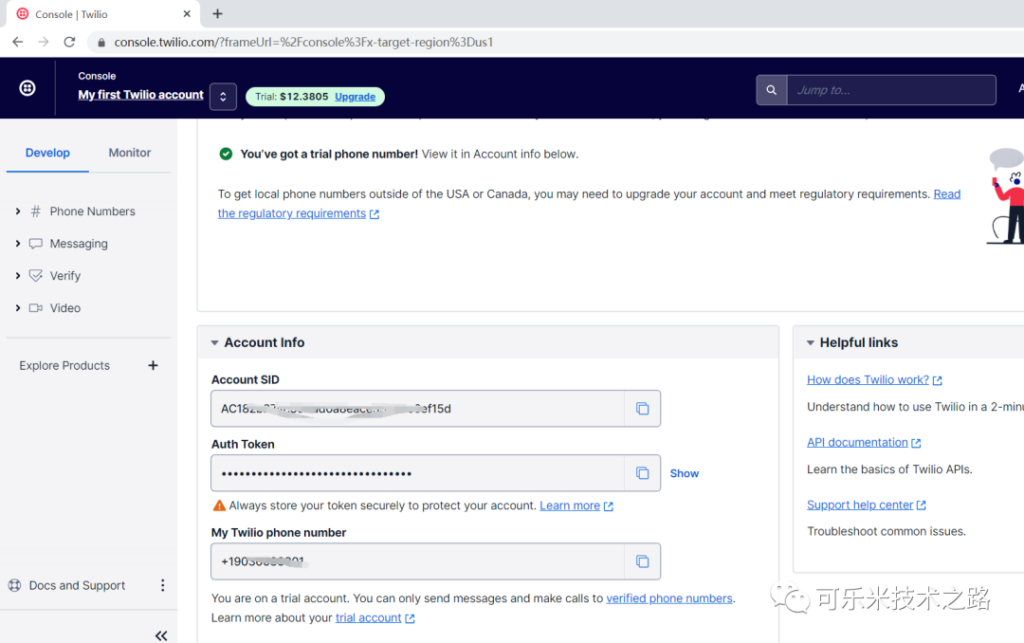
访问twilio.com注册账号,得到Account SID和Auth Token,再创建一个电话号码。后面程序中要用到。
安装twilio。
pipenv install twilio
再键入代码:
from twilio.rest import Client
account_sid = “AC182b274c396dd0a8*************”
auth_token = “95c2e02279bdb0338*****************”
# account_sid 、auth_token从twilio您的账户控制台复制过来
client = Client(account_sid, auth_token)
call = client.messages.create(
to=”+861385767****”,
# 这是要发送的目标手机号码
from_=”+1903608****”,
# 这是您申请的twilio手机号码,根据实际键入
body=”This is our first message!”
)
# 执行这段代码后,手机1385767****就会收到短信 “This is our first message!”
call还有很多属性可以查看,比如发送日期等。
网页抓取 Web Scraping
有时我们需要抓取网页上的数据,使用的是beautifulsoup4包。
先安装这个包,由于需要访问网页,同时安装requests包。
pipenv install beautifualsoup4
pipenv install requests
我们尝试抓取stackoverflow网站。
import requests
from bs4 import BeautifulSoup
response = requests.get(“https://stackoverflow.com/questions”)
soup = BeautifulSoup(response.text, “html.parser”)
# html.parser 表示是分析html
questions = soup.select(“.s-post-summary”)
# .s-post-summary这些class需要事先分析网页
for question in questions:
print(question.select_one(“.s-link”).getText())
print(question.select_one(“.s-post-summary–stats-item-number”).getText())
# 同样的,.s-link和.s-post-summary–stats-item-number这两个class也需要分析网页得到
浏览器自动化
想必大家都听过抢票软件,这就是浏览器自动化的一个应用。
浏览器自动化流行的包是 selenium
pipenv install selenium
再到pypi.org网站搜索selenium,下载适用于相应平台的浏览器的用于selenium的驱动程,比如chromedriver_win32.zip,解压后是个可执行文件chromedriver,将该文件拷贝到系统path.
比如Linux:
cp chromedriver /usr/local/bin
Windows:
拷贝到c:\windows目录下。
准备工作完毕后,下面编写代码。
from selenium import webdriver
from selenium.webdriver.common.by import By
brower = webdriver.Chrome()
brower.get(“https://github.com”)
signin_link = brower.find_element(By.LINK_TEXT, “Sign in”)
# 注意Sign in大小写,一定要与网页上显示的一致
signin_link.click()
username_box = brower.find_element(By.ID, “login_field”)
username_box.send_keys(“<输入实际用户名>”)
password_box = brower.find_element(By.ID, “password”)
password_box.send_keys(“<实际github的密码>”)
password_box.submit()
assert “chenyongping001” in brower.page_source
# 一般最好改成具体一点的断言
# 下面是查找具体范围的断言
left_list = brower.find_element(By.CLASS_NAME, “list-style-none”)
link_label = left_list.get_attribute(“innerHTML”)
assert “chenyongping001” in link_label
brower.quit()
# 别忘了这一句,否则窗口会太多。
使用PDF
实际工作中,我们经常需要编辑PDF文档,专业的PDF编辑软件一般都要收费,用python可以很方便地编辑PDF文件。
流行的包是 pypdf2
第一步自然是安装
pipenv install pypdf2
然后进行编码:
import PyPDF2
with open(“1.pdf”, “rb”) as file:
# 以读取方式打开
reader = PyPDF2.PdfFileReader(file)
print(reader.numPages)
page = reader.getPage(0)
page.rotateClockwise(90)
# 旋转90度
writer = PyPDF2.PdfFileWriter()
writer.addPage(page)
with open(“rotated.pdf”, “wb”) as output:
writer.write(output)
# 写入文件
# 执行后,能看到当前目录下有rotated.pdf文件,内容是旋转的1.pdf的第一页
合并PDF文件:
merge = PyPDF2.PdfFileMerger()
file_names = [“1.pdf”, “2.pdf”]
for file_name in file_names:
merge.append(file_name)
merge.write(“combined.pdf”)
# 在当前目录下生成合并后的PDF文件combined.pdf
使用Excel
使用的包是 openpyxl
pipenv install openpyxl
下面是示例代码,很简单一目了然:
import openpyxl
# wb = openpyxl.Workbook() # 空工作薄
wb = openpyxl.load_workbook(“transactions.xlsx”)
# 加载xlsx文件
print(wb.sheetnames)
# 输出 [‘Sheet1’]
sheet = wb[‘Sheet1’]
# wb.create_sheet(‘Sheet2’, 0)
# 创建工作表 Sheet2, 0表示索引,建在Sheet1前面。
# print(wb.sheetnames)
# 输出[‘Sheet2’, ‘Sheet1’]
# wb.remove(sheet)
# # 删除工作表
cell = sheet[“a1”]
print(cell.value)
print(cell.column)
print(cell.coordinate)
print(cell.row)
cell = sheet.cell(row=1, column=1)
# 也可以用这种方式
# print(sheet.max_row)
# print(sheet.max_column)
# 轻松获取工作表的行数列数
# 遍历
for row in range(1, sheet.max_row+1):
for column in range(1, sheet.max_column+1):
cell = sheet.cell(row, column)
print(cell.value)
column = sheet[“a”]
print(column)
# 列出列A
cells = sheet[“a:c”]
print(cells)
# 或
cells = sheet[“a1:c3”]
cells = sheet[1:3]
# 列出行1-行3
print(cells)
# 还有其他方法
sheet.append([1, 2, 3])
# 添加一行
sheet.delete_rows(17) # 删除第17行
sheet.delete_cols(6) # 删除第6列
sheet.insert_rows(2, 5) # 在第二行插入5行
sheet.insert_cols(2, 3) # 第第二列插入3行
wb.save(“transactions.xlsx”)
# 保存
注意,操作Excel时需要将命令与查询分离。
要么是查询返回结果,要么是执行命令改变状态,不能同时,否则可能会有不可预知的结果。
比如:
wb = openpyxl.load_workbook(“test.xlsx”)
sheet = wb[“Sheet”]
print(sheet.max_row)
# 原只有4行
cell = sheet.cell(10, 1)
# 这里不小心查了第10行,就相当于创建了6行
sheet.append([1, 2, 3])
# 再添加一行的话,就添加到了第11行
print(sheet.max_row)
# 得到11
numpy
大名鼎鼎的numpy,先安装
pipenv install numpy
代码示例,用法也是一目了然:
import numpy as np
array = np.array([[1, 2, 3], [4, 5, 6]])
print(array)
# 输出[[1 2 3]
# [4 5 6]]
print(array.shape)
# 输出(2, 3),表示2行3列,它比列表更少占用内存
print(np.zeros((3, 4)))
# 输出:
# [[0. 0. 0. 0.]
# [0. 0. 0. 0.]
# [0. 0. 0. 0.]]
# 生成3行4列的0,默认为浮点数
print(np.zeros((3, 4), dtype=int))
# dtype=int表示以整数0填充
# 类似也可以填充1
print(np.ones((3, 4), dtype=int))
print(np.full((3, 4), 5, dtype=int))
# 用5填充,第2个参数提供填充的数字
array = np.random.random((3, 4))
print(array)
# 用随机数填充
# [[0.4364024 0.28076237 0.18494641 0.41964315]
# [0.29489858 0.37849663 0.38891705 0.21401726]
# [0.23876546 0.81640328 0.73723944 0.88786748]]
print(array[0][0]) # python中标准用法
print(array[0, 0]) # numpy中用用法,接近数学实际
print(array > 0.2)
# array中的每一项都与0.2进行比较,然后输入矩阵结果
# [[ True False True True]
# [ True True True True]
# [ True True False True]]
print(np.sum(array)) # 计算数组项的和
print(np.floor(array)) # 去掉余数
print(np.ceil(array)) # 加余
print(np.round(array)) # 四舍五入
# 以下是算术运算
first = np.array([1, 2, 3])
second = np.array([1, 2, 3])
print(first+second) # [2 4 6]
print(first+2) # [3 4 5]
小结
本文介绍了python中常用第三方包的使用。
下一篇将是本系列的最后一篇,简单介绍机器学习的使用。至于python中流行的WEB后端开发Django,将独立开个主题详细介绍。