
在局域网内部网站用https打开时,经常显示“您的连接不是私密连接”,这是因为该网站的SSL证书未被客户端信任。而打开外部https://www.qq.com时,则不会警告,说明是被客户端信任的。本文就来讲讲如何实现有效的自签SSL证书。
概念
先简单介绍SSL证书,以及为什么我们需要它。
ssl证书是tls协议的一部分,它有两个主要目标:
- 加密连接
- 验证客户端和服务器的信任关系
这两个目标对当今网络安全都至关重要,如果没有SSL证书,就不会有https,也就不能真正安全地浏览网站。现在几乎所有的互联网网站都在运行https协议,并受ssl证书的保护。
您在打开网站时,能看到地址栏前有一个小锁,这表示该网站是安全的。
我们可以查看证书,找出包含的内容,可以看到是以x509标准来编写 ,这是一种用于定义公钥证书的格式。
所有ssl证书都有一个公钥,客户端使用该公钥加密信息并发给服务器。大致过程:
- 客户端访问服务器,服务器返回客户x509证书,其中包含有服务器的公钥。
- 客户端用收到的服务器公钥加密消息并发给服务器。
- 服务器用对应私钥解开客户端的消息,也只有该服务器能解开这个加密消息。
- 双方协商完成TLS握手,客户端和服务器就特定标准达成一致。
- 双方生成会话密钥,最终可以交换数据
看上去很简单吧?实际过程是很复杂的,我们只需知道一点就好:ssl证书包含公钥,该公钥被所有连接到该服务器的客户共享,服务器上相应的私钥能解开公钥加密的客户端消息。
前面是ssl证书的公钥部分,下面讲ssl证书的身份识别部分,这对于验证客户端和服务器的信任关系很重要。
作为客户端,肯定希望正在与正确的服务器进行通信。如果某个黑客在客户端与服务器冒充服务器,客户端通信的内容仍然是加密的,但他可以窃取所有通信数据,这就是中间人攻击。所以SSL证书要带上身份信息,这样客户端就能识别正确的服务器。
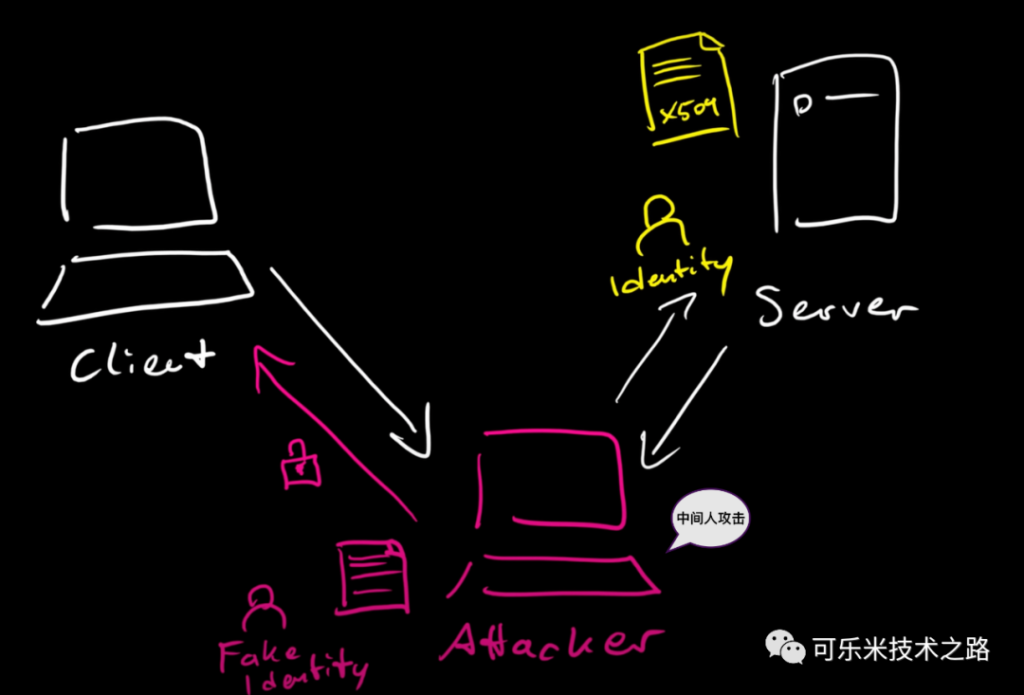
我们要创建自签名证书,要关注哪些重要参数呢?
- 首先是名称,浏览器要比对证书的名称与url是否一致。
- 再是过期时间。证书仅在特定时间段内有效。
- 第三是证书链,也非常重要。浏览器总是检查证书是否是由本机存储的信任的CA颁发。CA可以分级颁发,因此称为证书链。
可以查证书管理器,查看本机有哪些信任的CA。
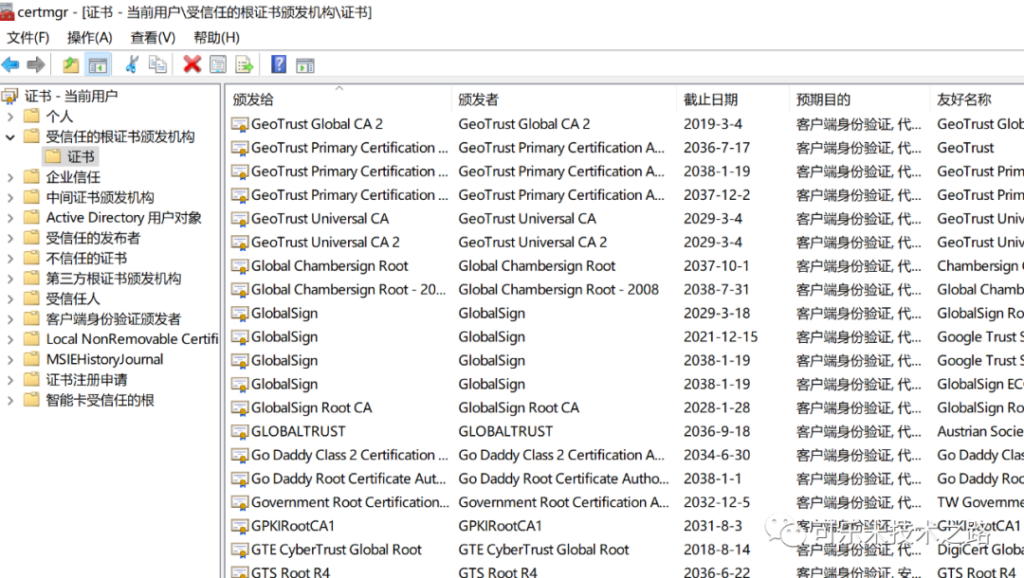
所以要想自签证书不被警告,需要在客户端存储自签CA。
实际操作
说了这么多,下面来实际操作下。
工具就是openssl,大多数Linux发行版都会自带的。
- 生成RSA密钥:
openssl genrsa -aes256 -out ca-tzfd-key.pem 4096
这个密钥一定要保存在安全的地方,这里我用了4096位增强安全,用aes256保护密钥.
2.生成新的x.509证书。
openssl req -new -x509 -sha256 -days 7300 -key ca-tzfd-key.pem -out ca-tzfd.pem
我们选择足够长的时间有效期7300天(20年),输入一些信息(可以随意),输出ca.pem
3.我们检查一下证书
openssl x509 -in ca-tzfd.pem -text
4.生成服务器密钥
openssl genrsa -out cert-10.150.181.88.key.pem 4096
与CA的密钥类似,这里不用aes加密。
5.创建服务器证书申请。
openssl req -new -sha256 -subj “/CN=zhenergy.com.cn” -key cert-10.150.181.88.key.pem -out cert-10.150.181.88.csr
这里的-subj可以随意写,下面会用一个配置文件标明
6.创建扩展文件用于指定alternative names,内部访问经常用的是IP地址:
echo “subjectAltName=DNS:*.zhenergy.com.cn,IP:10.150.181.88” > extfile.cnf
7.可选项
# optional
echo extendedKeyUsage = serverAuth >> extfile.cnf
8.创建证书
openssl x509 -req -sha256 -days 7300 -in cert-10.150.181.88.csr -CA ca-tzfd.pem -CAkey ca-tzfd-key.pem -out cert-10.150.181.88.pem -extfile extfile.cnf -CAcreateserial
我们验证下证书:
openssl verify -CAfile ca-tzfd.pem -verbose cert-10.150.181.88.pem
以上就创建了10.150.181.88的WEB证书。
我们是用根CA签署了服务器证书,存在证书链,我们要将CA证书和服务器证书合起来。
cat cert-10.150.181.88.pem>fullchain-10.150.181.88.pem
cat ca-tzfd.pem >>.\fullchain-10.150.181.88.pem
这样,服务器的证书和私钥就是 fullchain-10.150.181.88.pem和cert-10.150.181.88.key.pem。
对于客户端,我们还要将该CA存储为信任的CA。
windows下,以管理员身份运行下面命令(假设CA证书在c:\ca-tzfd.peam):
certutil.exe -addstore root C:\ca-tzfd.pem
后续,再用该CA签署其他https网站的话,客户端也都是信任了,无需再做相关操作。
附录:
1. 证书的格式有:
X.509 证书,以 Base64 格式PEM (.pem, .crt, .ca-bundle) ,
PKCS#7 (.p7b, p7s)
二进制格式DER (.der, .cer) ,
PKCS#12 (.pfx,p12)。
可以互相转换:
| COMMAND | CONVERSION |
|---|---|
openssl x509 -outform der -in cert.pem -out cert.der | PEM to DER |
openssl x509 -inform der -in cert.der -out cert.pem | DER to PEM |
openssl pkcs12 -in cert.pfx -out cert.pem -nodes | PFX to PEM |
2. 各操作系统方法导入CA信任证书方法如下(摘录,很简单不翻译了):
On Debian & Derivatives
- Move the CA certificate (
ca.pem) into/usr/local/share/ca-certificates/ca.crt. - Update the Cert Store with:
sudo update-ca-certificates
Refer the documentation here and here.
On Fedora
- Move the CA certificate (
ca.pem) to/etc/pki/ca-trust/source/anchors/ca.pemor/usr/share/pki/ca-trust-source/anchors/ca.pem - Now run (with sudo if necessary):
update-ca-trust
Refer the documentation here.
On Arch
System-wide – Arch(p11-kit) (From arch wiki)
- Run (As root)
trust anchor --store myCA.crt
- The certificate will be written to /etc/ca-certificates/trust-source/myCA.p11-kit and the “legacy” directories automatically updated.
- If you get “no configured writable location” or a similar error, import the CA manually:
- Copy the certificate to the /etc/ca-certificates/trust-source/anchors directory.
- and then
update-ca-trust
wiki page here
On Windows
Assuming the path to your generated CA certificate as C:\ca.pem, run:
Import-Certificate -FilePath "C:\ca.pem" -CertStoreLocation Cert:\LocalMachine\Root
- Set
-CertStoreLocationtoCert:\CurrentUser\Rootin case you want to trust certificates only for the logged in user.
OR
In Command Prompt, run:
certutil.exe -addstore root C:\ca.pem
certutil.exeis a built-in tool (classicSystem32one) and adds a system-wide trust anchor.
On Android
The exact steps vary device-to-device, but here is a generalised guide:
- Open Phone Settings
- Locate
Encryption and Credentialssection. It is generally found underSettings > Security > Encryption and Credentials - Choose
Install a certificate - Choose
CA Certificate - Locate the certificate file
ca.pemon your SD Card/Internal Storage using the file manager. - Select to load it.
- Done!